Using the Meeting Owl Camera for Videoconferencing
If you are planning a video-conference in the upstairs conference room in Greensboro you will need to bring two laptops. One laptop will present to the room and to the remote participants. The other laptop will be dedicated to the video call.
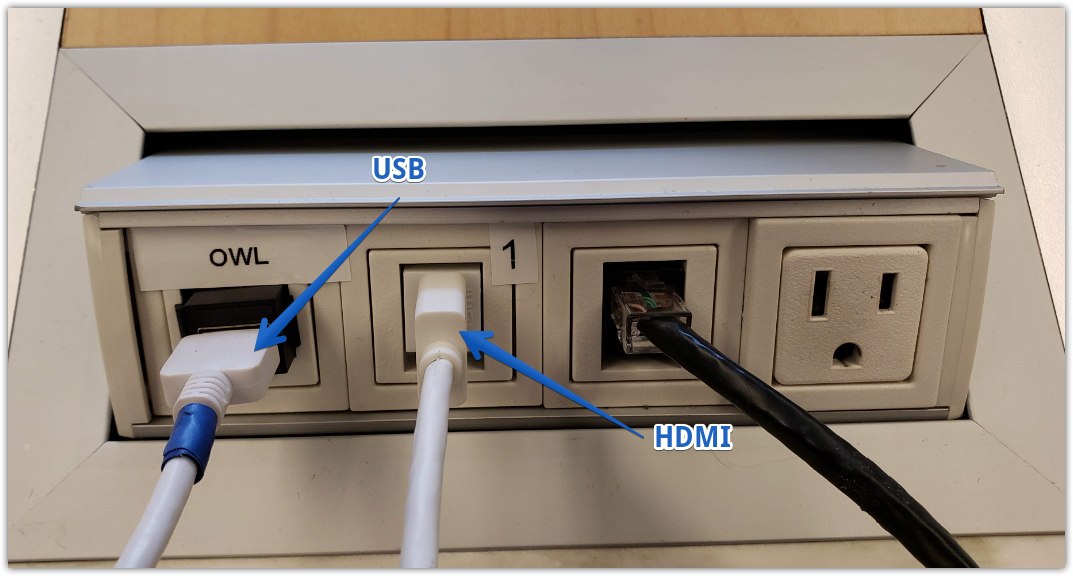
The laptop that will be dedicated to the video call must be connected to the Owl by the USB and HDMI cables in seat #1. Seat #1 is the first seat when the come into the room, opposite the projector screen.

These are the two cables that must be connected to your laptop. The USB is for the Owl. The HDMI is for you to display the video call on either the projector or the TVs. NOTE: The USB ports on the other 7 popups are charging ports only, for phones, tablets, etc. You cannot connect to the Owl anywhere other than seat #1.
Join the RingCentral meeting and be sure you choose the phone call option for audio. The Owl is a great camera but the conference room phone handles the audio much better.

Once you’re in the meeting click the up arrow beside the camera icon and be sure ‘Meeting Owl Camera’ is selected.

The Owl will take a few seconds to initialize and displays this screen.

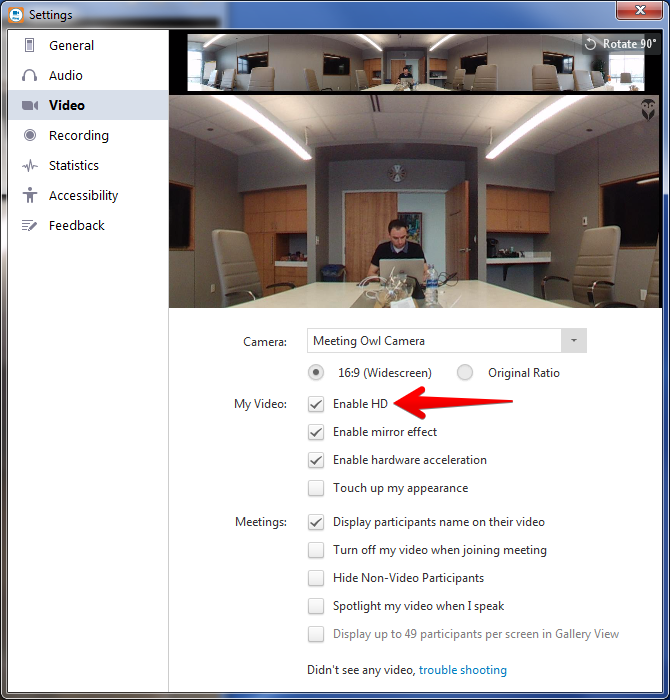
Once the Owl camera is live make sure HD video is enabled by clicking the up arrow beside the video camera and clicking ‘Video Settings…’

Check the box to ‘Enable HD’ and close the video options to return to the meeting.
Next you’ll need to choose where to display the video call by using the Extron switcher. Choose your destination first. Where do you want the video to display? After you select the destination tap on ‘Seat 1’ to send your laptop display to the preferred video destination. If you want to send the same feed to multiple outputs you’ll need to tap the destination then the source for each of the three possible outputs.
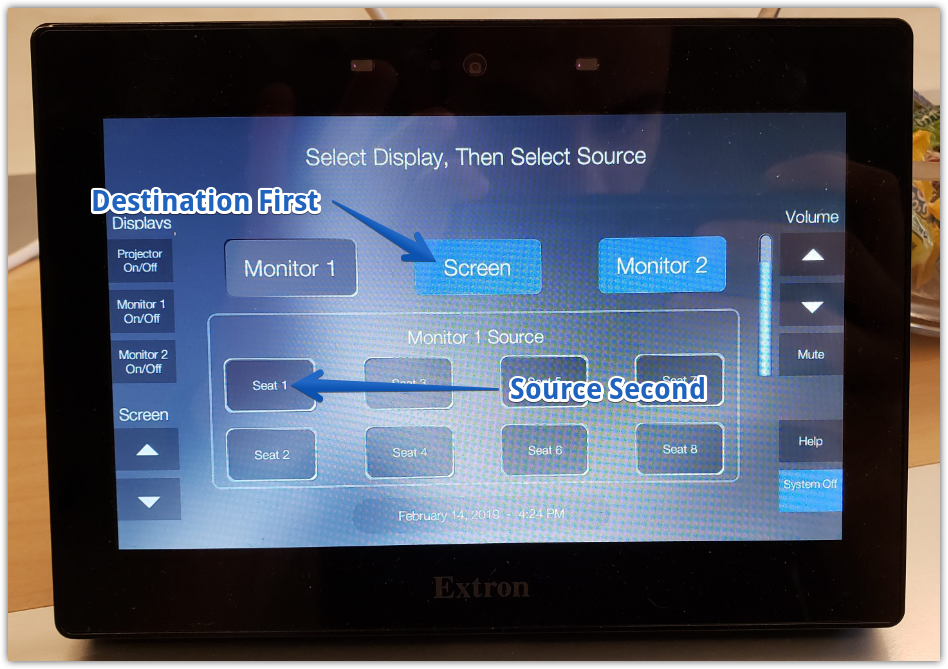
Whoever is presenting content for the participants should do so from another laptop. Everyone who joins the meeting in the room (in order to present) must ensure their audio and video are muted to prevent any feedback. They would display their content on a different output by tapping the destination first, then the source, which is the popup panel in front of them. Each popup panel is labeled by number.
When finished be sure to tap on ‘System Off’ at the bottom right to turn off the projector and TVs.
Feel free to reach out to IT if you would like our assistance in setting up for a meeting.
Related Articles
Zoom Migration FAQ
Below are some commonly asked questions about the Cross migration from RingCentral to Zoom. Are we only changing our meetings from RingCentral to Zoom? No, the entire RingCentral application is going away. All meetings, chat and phone will be in the ...Using the Snipping Tool / How to take screenshots in Windows
I can speak on behalf of everyone in all areas of support. We love screenshots! We don't so much love blurry photos of your monitor taken with your phone :) Windows comes with a fantastic utility called the Snipping Tool that many of you already ...Mobile App SSO
iOS For Android, scroll below Using the standard iOS update process in the App Store, install the NetSuite SSO Update. Once the App is installed, navigate to the NetSuite Mobile App and log out of the App if you're already signed in. Sign back into ...Printers - How To Connect
Each Cross office has a local print server. If you know the print server you can map your computer to any printers shared from that server. In order to view the printers follow these 3 simple steps: Click Start (or the Windows key on your keyboard) ...Signing into Microsoft Office/PowerBI for the first time
Please read all of the instructions before attempting for smoothest results How to sign into Office/PowerBI for the first time: Since you are receiving this article, we've already created your Microsoft account. - If you are tying to sign into ...